Blog
A primer on Gaussian Splats
Published on
October 15, 2025
Introduction
This blog post is here to do the following, in the most concise way possible:
- Explain what 3D Gaussian Splats are (3DGS for short).
- Talk about what they are good for and what they are not.
- Teach you how to make your own splats (with free and open-source tools).
What are Gaussian Splats?
A point cloud where each point is a little fuzzy puff of smoke. The puffs (or splats) have a color, orientation and scale. That's pretty much it. Why is this better than a regular old point cloud or a mesh? Because it turns out that if you adjust these little puffs in a clever way, they look photorealistic from any angle. In some cases, they look much better than a mesh. We'll talk more about that in a bit.
Adjusting the little puffs is called "training". It's a computationally expensive task that requires a high-end GPU and hours (or days) or processing, but it only needs to be done once. Rendering a 3DGS is much, much simpler, and really all that's required is to shoot out a ray and sample the splats it passes through.

Lets see an example. Here is a regular old point cloud:

This is the same but every point is a 10x10 square.

Here is a 3DGS but every splat is 5% of the opacity it should be.

A normal 3DGS.

Here is a closeup of a 3DGS where every splat has an outline:
3DGS vs MESHES
Let's look at a direct comparison.
This toggles between mesh and 3DGS every second. The one that looks much better is the 3DGS.
3DGS excel at organics. Vegetation, fur, things that have a lot of small detail.
You can interactively view this 3DGS here:
Here is another example, an antique Yashica camera. Left is 3DGS and right side is a mesh.
You'll notice that the 3DGS can capture reflections and even refractions. Which one is better? Well, I would say it depends. The reflections are nice, but they are "baked" into the 3DGS and might not match the rest of the scene.
Interactive 3DGS:
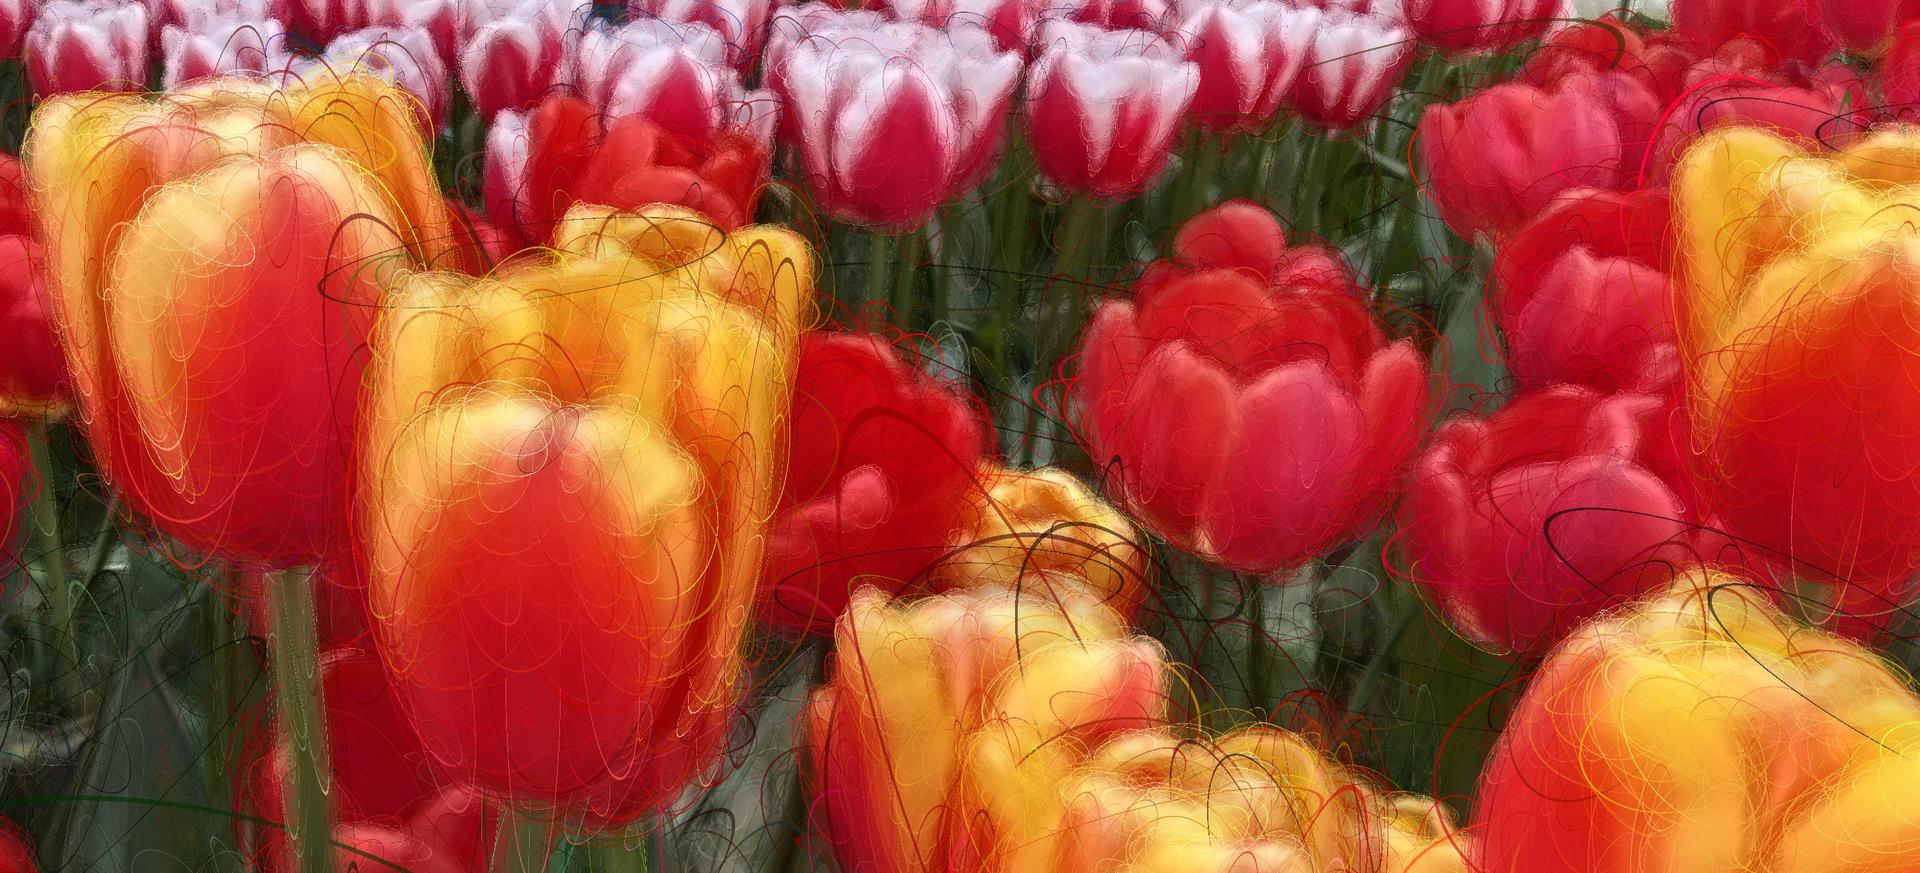
Here are some tulips that I scanned in Holland a few years ago.
This 3DGS is just 77 MB, and the level of detail is stunning. Here is a screenshot of the 3D model generated from the same dataset. This mode is 500 MB and looks like garbage, with a lot of fine detail missing (like most of the flower stems).

Last example is an antique typewriter (that predates the QWERTY layout) that I scanned at the London Museum (That's London, Ontario, Canada. The second largest London in the world).
3DGS:
Model:
There isn't a clear winner in this case. The model is 200 MB while the 3DGS is 88 MB. They both have some artifacts and glitches. I would say the 3DGS looks more photorealistic.
When to use which?
3DGS really shine when the object or environment has a lot of small detail, hair or fur, vegetation or organic material, shiny or even transparent surfaces. You'll get higher visual fidelity for less memory and rendering processing cost. What 3DGS doesn't have is a surface. It's essentially still a point cloud, so physics or dynamic lighting is really complicated. Not impossible, but very hard. Note that people are working on this, so this might change soon (Keep in mind this was written in Oct 2025).
With a mesh, I can easily do this:
Note the shadows (dynamic real-time lighting). Achieving this with a 3DGS would be really tricky and require lots of manual work.
To summarize, 3DGS pros:
- High visual fidelity, photorealistic
- Can capture reflections and refractions (but there's a catch, more on that later)
- Low memory footprint, faster rendering for high detailed objects
3D models are better for:
- Dynamic lighting
- Physics interactions
- Reflections that need to match a digital environment
Let's make a 3DGS
It's time to make our own 3DGS. For this you'll need a few things. We'll be using free and open-source software where possible.
Hardware:
- A decent camera. A good smartphone is ok, DSLR is better. The cheapest DSLR from 10 years ago will get you better results than a 2025 flagship smartphone.
- A PC running Windows or Linux with an NVIDIA GPU, RTX 2060 or better
Software:
- RealityScan from the Epic store (it's free for non-commercial use)
- LichtFeld Studio. It's free and open-source. Warning: setting it up is a long process (at least for Windows, I didn't try Linux). The instructions are very clear. It takes 2-3 hours and requires downloading about 20 GB of files, so be ready for that.
Software Alternatives:
- Brush Also open source, you can try it directly in a browser.
- Postshot - Used to be free but recently went to a subscription model. Free tier doesn't allow PLY export and there's no hobby / non-commercial tier, so I can't recommend it. It works quite well though.
- COLAMP - open-source project that does image alignment (and much more). Not easy to use but very powerful. Use this if you can't use RealityScan.
Step 1: Photography
This step (and also the next one) are almost identical to Photogrammetry. In fact, I'm going to copy-paste most of this step's content from my 2019 post, with a few small changes.
When shooting pictures for 3DGS, your goals are a bit different than “normal” photography. We'll go over what makes a good dataset for splats.
- Lots of pictures. At least 150 for an object, 500+ if you're scanning an environment.
- High quality photos, low noise and as sharp as possible.
- Shoot RAW if possible
- Shoot with a manually set white-balance and exposure (if possible)
- Wide DOF so that everything is in focus
- Avoid motion blur at all costs
- Flat lighting, no shadows or highlights
The last two are important so I'll elaborate. You want your lighting to be as flat as possible, like the rock on the right. These make for visually unappealing photos, but remember that our goal is a good scan, not a good picture.

You will need to walk around your subject and shoot many pictures from different angles. I usually do three rotations, high, medium and low. If the object is complex you'll want to get in closer and do some sweeps over different parts of it. Remember that you want parallax, so always move the camera between shots and maintain a lot of overlap. 80% or more.

If you are pressed for time (or just lazy), you can shoot video. It won't be as good as shooting stills, due to video compression, rolling shutter and motion blur, but it can work. Especially if there's a lot of light. Shoot at least 4k and hold it as steady as you can. Then process the video with a tool that detects and extracts the sharpest frames, there are several of them. I've used these two, and they both work well:
https://github.com/cansik/sharp-frame-extractor
https://sharp-frames.reflct.app
If you shot your pictures using RAW (which you really should, if you have that option), open them in your favorite RAW processing software, and flatten the lighting. Bring up shadows and bring down highlights. Export as PNG.

Step 2: Alignment
In this step we'll use Photogrammetry software to align the photos and create a point cloud. There are several good options here, we'll be using RealityScan (RC for short) which is free (for projects under $1m).
Drag all your pictures into RC, go to ALIGNMENT -> Settings. If your dataset is good quality set the Max feature reprojection error to 1. If it's not, or you're not sure, set it to 5 or even 10. Press "Align Images" and wait. This will take a few minutes to a few dozen minutes, depending on number of pictures and your GPU.

When it's done, you'll have between zero and many "Components". If you have just one, and it contains all or most of your photos, great! You did a good job shooting. If you have several components, you have a few more steps. Your goal is to have one component with as many photos as possible.
In this example, I got two components:

There's a "Merge Components" button but honestly that has never worked for me and not sure what it even does. The trick I use is to go back to the alignment settings and increase the Max Error. Start with 10. Align images again, you should get a single component. Then change Max Error to 8, align again, change to 6, align again, etc. Continue until you get to 1, or 2. You can delete all the components except the one that has all the photos.
Clicking on the component will show you the point cloud. It might not be aligned correctly, like this:

Now is a good time to fix that. Go to Tools, clear the bounding box and then use the "Set Ground" to rotate the point cloud until it's more or less aligned correctly. Almost done, we just need to export the point cloud. Go to ALIGNMENT -> Export -> Registration. Pick "Colmap Text Format" as the output type. Make a new folder (I usually name it "Colmap") and save it there (the filename doesn't matter). This settings page will appear, and you'll need to change a few things from the default values:

Set the "Max count of pixels" to be 2073600 (that's 1920x1080). You can set it higher, or set it to zero and it will use the resolution of the source images, but that slows down the training (next step) by a lot and I find doesn't actually contribute much to the quality. You'll need to experiment.
Set "Export Images" to "Yes" and then set the "Image path" to be the same as the "Export Location". This doesn't happen automatically for some reason, so you'll have to do this every time you export a scene.
That's it, press OK and wait a minute or two. I would also save the RC project, maybe you'll want to come back to it and redo things.
Step 3: Training the 3DGS
Open LichtFeld Studio (LFS for short) and drag the Colmap folder you've just created into it. You should see a point cloud. There are some settings in the UI that you can change (and a lot more that are only available via command line). I won't go into most, as they can get quite complex and very "rabbit-holey" but we'll talk about the important ones.
"Max Gaussian" sets the maximum number of splats that will be generated. It will start by converting each point in the cloud to a splat, but then they will split and multiply as the training progresses. The max number of splats will be limited by your VRAM and RAM amount. I have 8GB VRAM and I can do about 3m splats before the training iterations per second drops from 10 to 0.2, a sign that VRAM is full and it's using shared RAM which is much much slower.
What is this training anyway? In a nutshell, on every iteration a photo (camera) will be selected at random, and then the splats will be adjusted (a bit) to better match that lucky photo. Rinse and repeat a few tens of thousands of times. This is a iterative process that doesn't really have a well defined ending point. The "Iteration" number is a guess, you can just stop training when you feel it looks good enough.
Here is what one of my 3DGS did during training. From left to right, top to bottom, zero iterations, 150, 500, 1500, 4000, 20000. You can see there is very little improvement beyond the 4000 mark.

There are lots of other parameters you can adjust (and I do mean LOTS). They are not easy to understand and ample experimentation is needed. Here is a great Discord to ask questions and brainstorm about 3DGS and LFS:
https://discord.gg/NqwTqVYVmj
When you are happy with your 3DGS, or the training concluded, export it as a PLY file.
Step 4: Cleanup and Sharing
Congrats! You made your first 3DGS. It's probably a bit of mess, with little blobs floating in the air and a giant mess underneath your object, or all around it. That's normal. You can get rid of those, if you want to. Sometimes they contribute to the ambiance, so to speak. There are a few options, I'll specify two, you can use none, either or both.
The Automatic Option
This nifty open source tool called PointNuker is pretty easy to use and will automatically delete splats that are isolated from others, what we call "floaters". Follow the suggested workflow.
Here is before and after:

The Manual Option
There are several tools for editing 3DGS, I use SuperSplat. It works in a browser, just drag your PLY file into the editor. You can hunt down and delete the floaters or anything else you want to get rid of.
Sharing your amazing splats
For sharing, I also use SuperSplat. When you are doing editing, you can just hit publish and share the link with anyone. It's great fun! Here is my latest:
Random thoughts and tips
Transparency
The way 3DGS can capture all sorts of optical effects is really cool and useful, however I find it's a bit of a double edged sword. We've learned that the first step of making a 3DGS is aligning the photos, and that process is negatively impacted by the presence of reflections and refractions. It's a fine balance, on one hand 3DGS can handle reflections, on the other hand the alignment phase will give poor results or fail completely if there are lot of reflections.
Obstructions in photos
Make sure none of your photos have an obstruction. Here is an example from the Tulips dataset. As I was walking around the tulips bed and shooting, I had to walk around this guy and he took up half the frame.

I was originally shooting this dataset for Photogrammetry, and for an obstruction like that doesn't really do much, the algorithm will just ignore the points it can't triangulate. 3DGS is a different story. During training, this photo would be randomly chosen and then all the splats would go out of whack trying to adjust themselves to look like a guy in a dark coat. This one photo kept ruining the entire splat every time it was picked. Bottom line, make sure you don't have obstructions :)
That's pretty much it, if you find this a useful article, please post your splat in the comments. If you're a developer I will soon publish a post about how to import and render splats in Unity3D.
Thanks for reading!