
Blog
3D scanning using Photogrammetry and an automated turn table
Published on
March 15, 2017
I’m working on a VR game and I needed a bunch of household “old-timey” objects. Since my 3D modelling skills are limited to CAD, I decided to 3D scan these items. Luckily I happen to have a collection of antique cameras, so these were good candidates. After much experimentation here is the setup I ended up with, and it works very well.
Software
You will need photogrammetry software, I used Agisoft Photoscan. They offer a 30 day fully functional trial, which is nice. You can also try the free and open source VisualSFM. It works well but is a bit tricky to setup and use.
EDIT Jan 2019: Since I wrote this, RealityCapture has disrupted the photogrammetry market. It’s much *much* faster and usually produces better results. However, the UX is terrible, their DRM is draconian and it’s very expensive ($30/month, it adds up quick).
Lighting
It is crucial that you have uniform and shadowless light. This can be achieved in several ways, with (expensive) studio lighting gear, reflectors, softboxes or simply shooting outdoors on a gray overcast day. I cleared out a small storage space in my basement and placed inside a single LED light pointing at the ceiling. Whatever works for you, just get that light to be as uniform as possible.
Turn Table
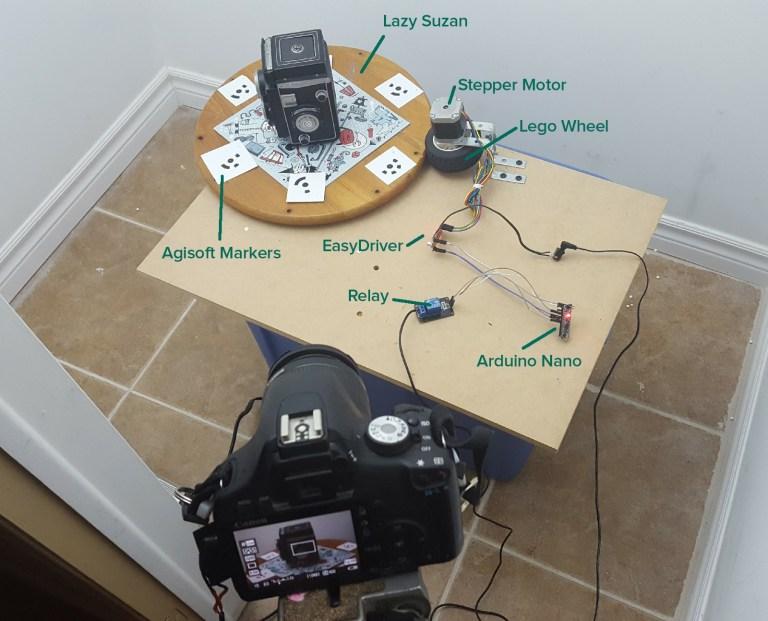
While it’s not mandatory to have an automated turn table it does make life a lot easier, and it’s fairly simple to do. You will need:
- Arduino (or clone), I used the Nano but any version would do.
- Stepper Motor
- Stepper Motor driver (I used the EasyDriver for this project)
- A Relay Module for Arduino (you can also use a transistor if you are feeling adventurous)
- A wired remote for your camera
- A lazy suzan turn table (I got mine from Goodwill for $2)
- 12V power supply
Mount the turntable on a piece of wood, hook up the motor with some kind of wheel (I used Lego). There is some improvisation needed here, so be ready to tinker. Connect the EasyDriver to the Arduino (here is a nice guide). Hookup the relay to the arduino (like this).
Cut the wired remote and connect the leads to the relay. You might need to experiment with which wires to connect, there will probably be 3 wires in there to simulate half-press and full-press of the trigger button. You want full-press.
I wrote a very simple program to drive the table and trigger the camera, you can find it here. I opted for 52 exposures per rotation, and I usually shoot three angles, Low (looking slightly up), mid level and high (looking down at the object) for a total of 156 images.
Place something with a lot of texture on the turn table, like a magazine cutout. If you are using Agisoft, print and add a few markers (in Agisoft go to the Tools menu -> markers -> print markers). These help Agisoft orient the cameras properly.
Camera
You’ll want the best camera you can get your hands on. A DSLR is a must. Sorry, your iPhone just won’t cut it for this application. Set your camera to fully manual, close the aperture to increase the Depth Of Field (I shoot at f11), set exposure time to whatever works (but keep it fixed) and ISO should be below 800. Set camera to manual focus and shoot RAW. Slap on a polarizing filter if your object has shiny or reflective surfaces.
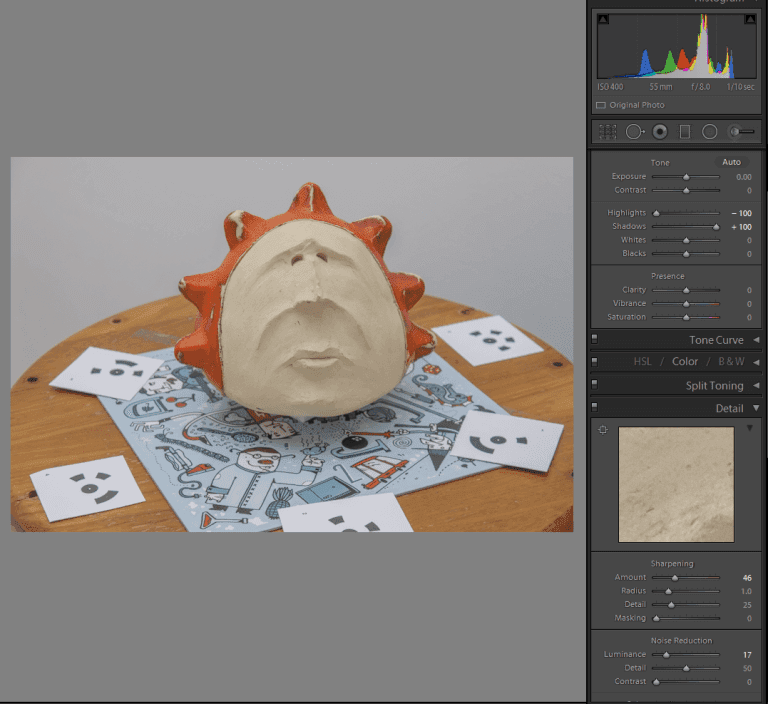
RAW Post-processing
Open the RAW files in your favorite RAW editing software. Bump up the shadows and pull down the highlights to make the image as “flat” as possible. Increase sharping a little, and add some noise removal. Crop if needed, export as PNG.
Agisoft
- Create a new project, add all the images
- If you have markers visible, do Tools->Markers->Detect Markers
- Run Workflow->Align Cameras using “High” quality setting (this can take 10-20 minutes)
- Using the “Resize region” tool (in the toolbar) adjust the region of interest to include only your object (and not the turn table).
- Run Workflow->Build Dense Cloud using “High” quality setting (this will take 1-2 hours). I once tried “Ultra High” and it worked for 20 hours and then crashed with an “out of memory” error. I’ll stick with “High”.
- Run Workflow->Build Mesh. It’s best to use high polygon count and then decimate.
- [Optional] Export the mesh, open it in Z-brush or MeshLab, clean, simplify or resurface it. Close holes, deleted small floating noise, etc. Just make it nice. Then drag it back into Agisoft, and it will replace the mesh there.
- Run Workflow->Build texture with a 4k or 8k texture.
- Export Mesh, done.
Conclusion
3D scanning stuff is fun and frustrating. Some things work well, some don’t. Reflective surfaces are difficult, also objects that are smooth and without detail will fail or generate noisy result. When it works though, it’s stunning.
Here is my setup in action:
And the resulting scan: MODEL
And one more video, this time in VR and with a bunch of scanned objects: